NSX 6.4 Custom Dashboard Widget
Out of the box you will find a number of widgets showing a summary of your NSX setup.
As an example, one of the default NSX widgets showing information about the backup status.
That's pretty cool, but it gets better, you can use the NSX REST API to create your own custom Dashboard widgets and even share them with other users.
We will lead you through the process of defining your custom widget, registering it with NSX Manager, updating it and deleting it.
Step 1: Define your widget
There are currently 2 types of widgets – Label Value and Grid. As the first article on this subject, we’ll focus on working with the simpler Label Value.
In our example we will display information that could be useful in the day-to-day activities of an NSX/vSphere administrator: NSX version, build number and status of the SSH service on the NSX Manager (it’s a common miss to leave it running after troubleshooting).
Below is the sample xml definition of our widget:
Important properties:
• resourceType – we will focus on Label Value type of widget, therefore the resource type is set to LabelValueConfiguration
• shared – true or false, specifies if the widget will be shared with other users having access to NSX Manager’s Dashboard
• revision – the revision (version) of the widget. Based on the NSX REST API documentation the revision is auto-generated and auto-updated. Indeed, you can omit it during first registration and first update. However, when you need to update your widget later on, you will need to specify revision equal or higher than the current one, otherwise you will get the following message:
{
"errorCode": 220,
"details": "The value com.vmware.vshield.vsm.exceptions.StaleObjectStateException: core-services:206:The object null used in this operation has an older version 0 than the current system version 18. Refresh UI or fetch the latest copy of the object and retry operation.: []. for {1} is invalid. Valid value should be {2}",
"moduleName": "core-services"
}
• datasources – lists the REST API endpoints from which we will retrieve data for our widget. Currently, only NSX API is supported. In our example there are 2 URLs and you can specify alias for each of them which will be used to reference the endpoint later
• properties – this section contains the properties of our widget
• field – the value of the property. It can be statically defined or a value retrieved from REST request. When is the latter, it should follow the format: #{..}
• renderConfiguration – section where you can set a condition for the value based on supported expressions
• condition – contains the expression that is to be evaluated
• displayValue – overrides the field property when the condition is met
• icons – can be used to display an icon next to the value
This is sufficient set of properties to get you started. For fully comprehensive information, you can refer to the NSX API documentation.
Step 2: Register with NSX Manager
Now when we have the widget defined, we can use the following endpoint to register it with the NSX Manager:
POST https:///api/2.0/services/dashboard/ui-views/dashboard/widgetconfigurations
The body of this POST request should contain the widget definition that we specified above andhe user account used for authentication needs to have at least Security Administrator privileges on NSX Manager.
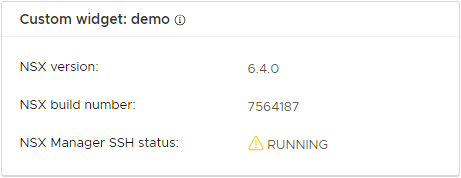
If all goes as expected, the result of issuing this request will be with status 201 Created andthe body will contain the specification of your widget. This is how the end result appears in the NSX Dashboard:
Since the SSH service was running, we had a warning displaying for the corresponding property.
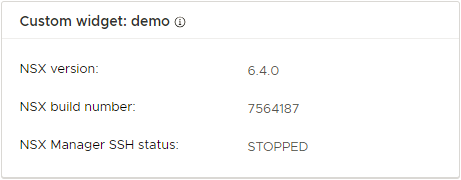
After stopping the SSH service the warning icon disappears:
How to update the widget
Updating the widget is very similar to performing registration. You need to issue a PUT request to the following endpoint, providing the widget definition in the body:
PUT https:///api/2.0/services/dashboard/ui-views/dashboard/widgetconfigurations/
The widgetconfigurationId can be obtained by calling
GET https:///api/2.0/services/dashboard/ui-views/dashboard/widgetconfigurations
where the result will contain data for all widgets including the custom ones.
Note: As mentioned before, the important thing to have in mind here is to keep the revision updated.
How to delete the widget
Deleting is the easiest operation of all. Just submit DELETE request to:
DELETE https:///api/2.0/services/dashboard/ui-views/dashboard/widgetconfigurations/
providing the widgetconfigurationId
You can already start thinking about customizing your own view.
We will follow up later on with some more advanced widget configurations.
Ivaylo Ivanov, VMware EngineerNSX for vSphere 6.4 was released a few months back (January 16, 2018) bringing many improvements. One of which is a new NSX default homepage, known as Dashboard.
Click to view larger image ↑
Click to view larger image ↑
Click to view larger image ↑
Click to view larger image ↑
Click to view larger image ↑