August 24, 2022
Runecast’s latest version, 6.2, has enabled a deeper protection and integration with Kubernetes, enabling scanning not just clusters, but nodes as well. If you’d like to read more about our KSPM capabilities, you can read this article on the improvements brought by version 6.2.
In this deep-dive article we’ll be talking specifically about using Runecast as an admission controller. We leverage the admission controller functionality of Kubernetes and let you use Runecast as a validation admission webhook. This means that your workloads are scanned before they reach the cluster, ensuring they are free from critical vulnerabilities or unpatched security risks.
Our Systems Engineer, Tomas Odehnal, walks you through all the steps below, including how to:
To demonstrate the functionality we have prepared a cluster with one node hosting the control-plane and one node to run the workload.
{% code-block language="shell" %}
$ kubectl get nodes
NAME STATUS ROLES AGE VERSION
k8s-mst01-test Ready control-plane 110m v1.24.3
k8s-wrk01-test Ready none 109m v1.24.3
{% code-block-end %}
We will deploy an instance of Runecast to the cluster using helm. First, we add the Runecast helm repository:
{% code-block language="shell" %}
$ helm repo add runecast https://helm.runecast.com/charts
"runecast" has been added to your repositories
{% code-block-end %}
After that we can deploy Runecast to the new namespace:
{% code-block language="shell" %}
$ helm install runecast-analyzer runecast/runecast-analyzer --namespace runecast –-create-namespace --set nginx.service.tls.enabled=true
NAME: runecast-analyzer
LAST DEPLOYED: Mon Aug 1 15:23:13 2022
NAMESPACE: runecast
STATUS: deployed
REVISION: 1
NOTES:
To access the Runecast Analyzer application, follow the instructions:
Run the following command and visit https://127.0.0.1:9080/ to use the application:
kubectl --namespace runecast port-forward service/runecast-analyzer-nginx 9080
{% code-block-end %}
We enabled the secure connection on the service, as the Kubernetes API requires a secure connection to the admission webhook.
Once all the pods are ready, we can move onto the next step.
{% code-block language="shell" %}
$ kubectl --namespace runecast get pods
NAME READY STATUS RESTARTS AGE
runecast-analyzer-6fb4b5d7f-w7g6l 1/1 Running 0 2m20s
runecast-analyzer-imagescanning-5c946df9b7-4lgtf 1/1 Running 0 2m20s
runecast-analyzer-nginx-dcdd9bbfd-r5md8 1/1 Running 0 2m20s
runecast-analyzer-postgresql-6cfbdd49d8-znm67 1/1 Running 0 2m20s
{% code-block-end %}
To access the Runecast UI, we will start the port-forwarding as stated in the helm command output. In production, you would probably use ingress to reach the service from outside of the cluster, but in this example let’s settle for the localhost access.
{% code-block language="shell" %}
$ kubectl --namespace runecast port-forward service/runecast-analyzer-nginx 9080
Forwarding from 127.0.0.1:9080 -> 9443
Forwarding from [::1]:9080 -> 9443
{% code-block-end %}
We can now login to Runecast UI on https://localhost:9080 with the default credentials, username {% code-line %}rcuser{% code-line-end %} and password {% code-line %}Runecast!{% code-line-end %}:
In the initial wizard we select Kubernetes:
We need to create a service account token, a cluster role and cluster rolebinding that will grant Runecast the sufficient permissions. Please find more details in the user guide https://docs.runecast.com/system_requirements.html#kubernetes_1.
{% code-block language="shell" %}
$ NAMESPACE="kube-system"
$ TOKEN_VALIDITY="8760h"
$ kubectl create serviceaccount runecast-analyzer-scan -n ${NAMESPACE}
serviceaccount/runecast-analyzer-scan created
$ kubectl create clusterrole runecast-analyzer-scan --verb=get,list,watch --resource=nodes,namespaces,pods,replicationcontrollers,serviceaccounts,services,daemonsets.apps,deployments.apps,replicasets.apps,statefulsets.apps,cronjobs.batch,jobs.batch,networkpolicies.networking.k8s.io,podsecuritypolicies.policy,clusterrolebindings.rbac.authorization.k8s.io,clusterroles.rbac.authorization.k8s.io,rolebindings.rbac.authorization.k8s.io,roles.rbac.authorization.k8s.io
clusterrole.rbac.authorization.k8s.io/runecast-analyzer-scan created
$ kubectl create clusterrolebinding runecast-analyzer-scan --clusterrole=runecast-analyzer-scan --serviceaccount=${NAMESPACE}:runecast-analyzer-scan
clusterrolebinding.rbac.authorization.k8s.io/runecast-analyzer-scan created
$ kubectl create token runecast-analyzer-scan --duration=${TOKEN_VALIDITY} -n ${NAMESPACE}
eyJhbGciOiJSUzI1NiIsImtpZCI6Ikt0eklHYXRYbXpxdGdKNXlRQThFcDRHX3JEWEdkbURBZnNtajJsT1NPdFEifQ.eyJhdWQiOlsiaHR0cHM6Ly9rdWJlcm5ldGVzLmRlZmF1bHQuc3ZjLmNsdXN0ZXIubG9jYWwiXSwiZXhwIjoxNjkwODk3MTYzLCJpYXQiOjE2NTkzNjExNjMsImlzcyI6Imh0dHBzOi8va3ViZXJuZXRlcy5kZWZhdWx0LnN2Yy5jbHVzdGVyLmxvY2FsIiwia3ViZXJuZXRlcy5pbyI6eyJuYW1lc3BhY2UiOiJrdWJlLXN5c3RlbSIsInNlcnZpY2VhY2NvdW50Ijp7Im5hbWUiOiJydW5lY2FzdC1hbmFseXplci1zY2FuIiwidWlkIjoiM2U4YzFmZTYtYjgyMi00NTRjLWI5ZGQtYzc1MTMxMzFlMzkzIn19LCJuYmYiOjE2NTkzNjExNjMsInN1YiI6InN5c3RlbTpzZXJ2aWNlYWNjb3VudDprdWJlLXN5c3RlbTpydW5lY2FzdC1hbmFseXplci1zY2FuIn0.Y8WigT0HgXypwjng1cqO40uIpt-FfeHDy3rsZFaxQ_gNLaj7X7rWrntk_S9RqwSTWPffE7BzHtztlbP3eGIUSq8VLgYiHXKCPxkq7HB3FHRIO1JKusJnUvAxbcIE_CnP8paIVNKJnQF-Y8exTlvyx_uhGmxc25m1haf-tFR0qk68yAdUw5OaJPUZ6oIWElZndkh4MfZBMwMVjdmYHMl-XLRk9o9xz31PeW6wEZJgAaen5fuDSZ_h0zCkwCVtPjYtSCNDkuNKBxJQttpe_-2Q_-uXtw7ORlqfyOvUFQ2JUiktwbAicqItTCnjLIB5L0JtBJqsXn1o1dg4_DP_RapyFg
{% code-block-end %}
We won’t select the available security profile:
We can confirm the default schedule:
Finally, the last step of the wizard is to confirm all the settings and run the analysis.
In the UI, navigate to Settings > API Access Tokens and click on Generate API access token.
Copy the token and save it for later.
We can now move on to the next step and configure the webhook authentication on Kubernetes API server.
To set up the control plane to authenticate to the Runecast API we need to:
On the master node, we will create a new directory and later map this as a volume to kube-apiserver pod. While you can store the files in one of the directories that are already accessible by kube-apiserver in default configuration, it’s better to create a separate directory that might be used to store additional files, like auditing configuration.
{% code-block language="shell" %}
sudo mkdir /etc/kubernetes/config
{% code-block-end %}
Create the kubeconfig file that contains the authentication token. We will use the token we generated in the previous chapter and the name of the Runecast nginx frontend service:
{% code-block language="yaml" %}
$ RUNECAST_TOKEN="b804386f-12e6-491c-ae1a-a64c5fa35f0c"
$ RUNECAST_ADDRESS="runecast-analyzer-nginx.runecast.svc:9080"
$ echo | cat | sudo tee /etc/kubernetes/config/runecast-validating-webhook-kubeconfig.yaml > /dev/null << EOF
apiVersion: v1
kind: Config
users:
- name: '${RUNECAST_ADDRESS}'
user:
token: '${RUNECAST_TOKEN}'
EOF
{% code-block-end %}
Create the admission configuration file that makes sure the admission controller is able to authenticate using the provided kubeconfig file:
{% code-block language="yaml" %}
$ echo | cat | sudo tee /etc/kubernetes/config/runecast-admission-configuration.yaml > /dev/null << EOF
apiVersion: apiserver.config.k8s.io/v1
kind: AdmissionConfiguration
plugins:
- name: ValidatingAdmissionWebhook
configuration:
apiVersion: apiserver.config.k8s.io/v1
kind: WebhookAdmissionConfiguration
kubeConfigFile: "/etc/kubernetes/config/runecast-validating-webhook-kubeconfig.yaml"
EOF
{% code-block-end %}
Now modify the kube-apiserver manifest file to use the admission configuration file. Under the {% code-line %}- kube-apiserver{% code-line-end%} line located in {% code-line %}.spec.containers.command{% code-line-end %} we will add the parameter {% code-line %}--admission-control-config-file{% code-line-end %} :
{% code-block language="yaml" %}
...
spec:
containers:
- command:
- kube-apiserver
- --admission-control-config-file=/etc/kubernetes/config/runecast-admission-configuration.yaml
...
{% code-block-end %}
We will also map the new directory to the kube-apiserver pod. In the manifest file, find the {% code-line %}.spec.volumes{% code-line-end %} section and add a new mapping of the host directory to the pod:
{% code-block language="yaml" %}
...
volumes:
- hostPath:
path: /etc/kubernetes/config
type: DirectoryOrCreate
name: etc-kubernetes-config
...
{% code-block-end %}
Under the {% code-line %}.spec.containers.volumeMounts{% code-line-end %} section add a new setting to mount the above volume to the kube-apiserver container directory:
{% code-block language="yaml" %}
...
volumeMounts:
- mountPath: /etc/kubernetes/config
name: etc-kubernetes-config
readOnly: true
...
{% code-block-end %}
Lastly, we save the kube-apiserver manifest file and wait for the pod to restart. To verify the new settings are in place, we will grep the running kube-apiserver pod manifest: Once we find the {% code-line %}admission-control-config-file{% code-line-end %} parameter in the output, we can continue.
{% code-block language="yaml" %}
$ sudo kubectl -n kube-system get pods -l component=kube-apiserver -oyaml | grep 'admission-control-config-file'
- --admission-control-config-file=/etc/kubernetes/config/runecast-admission-configuration.yaml
{% code-block-end %}
For more information about the webhook authentication settings, please see the official documentation
Once the authentication is configured on the control plane, you can create the admission webhook configuration.
The configuration tells the API server for which objects and operations to call a specific validating webhook. The objects can be selected using multiple options. To see the complete list, please check the official documentation.
{% code-block language="yaml" %}
apiVersion: admissionregistration.k8s.io/v1
kind: ValidatingWebhookConfiguration
...
webhooks:
- name: my-webhook.example.com
rules:
...
objectSelector:
...
namespaceSelector:
...
clientConfig:
...
- name: another-webhook.example.com
...
{% code-block-end %}
In this example, we will create two webhook configurations:
First we will define the rule to select the objects and operation:
{% code-block language="yaml" %}
rules:
- apiGroups: ["*"]
apiVersions: ["v1"]
operations: ["CREATE","UPDATE"]
resources: ["pods","daemonsets","deployments","replicasets","statefulsets", "replicationcontrollers","cronjobs","jobs"]
scope: "Namespaced"
{% code-block-end %}
Next, we will use a {% code-line %}namespaceSelector{% code-line-end%} that makes sure that only objects in the specifically labeled namespaces are checked. For the first webhook:
{% code-block language="yaml" %}
namespaceSelector:
matchExpressions:
- values:
- '1'
operator: In
key: runecast-admission-policy
{% code-block-end %}
And similarly for the second webhook:
{% code-block language="yaml" %}
namespaceSelector:
matchExpressions:
- values:
- '2'
operator: In
key: runecast-admission-policy
{% code-block-end %}
Now any namespaces that will be labeled {% code-line %}runecast-admission-policy{% code-line-end%} with id {% code-line %}1{% code-line-end %} or {% code-line %}2{% code-line-end %} will match.
Lastly, we need to define the webhook in the {% code-line %}clientConfig{% code-line-end %} field. We are running Runecast in the same K8s cluster and will refer to it using the {% code-line %}service{% code-line-end %} definition. If Runecast was running outside of the configured cluster, we would use the {% code-line %}url{% code-line-end %} definition to link to the webhook, but this is out of the scope of this article. Please check the integration examples in Runecast documentation.
First webhook:
{% code-block language="yaml" %}
...
clientConfig:
service:
namespace: runecast
name: runecast-analyzer-nginx.runecast.svc
path: /rc2/api/v2/k8s-admission-policy-review/policy/1
port: 9080
...
{% code-block-end %}
Second webhook (note the path):
{% code-block language="yaml" %}
...
clientConfig:
service:
namespace: runecast
name: runecast-analyzer-nginx.runecast.svc
path: /rc2/api/v2/k8s-admission-policy-review/policy/2
port: 9080
...
{% code-block-end %}
Additionally, the Kubernetes API verifies the trust of the webhook certificate. In production, your K8s cluster (and thus the kube-apiserver pod) might already trust the Runecast certificate, either because it is issued by a public CA or your internal enterprise CA and the trust was established. In our case we issued a self-signed certificate for Runecast and will need to let the kube-apiserver trust it. The issuer of the certificate (which is the actual certificate for those self-signed) needs to be set as a base64 encoded string in the {% code-line %}caBundle{% code-line-end %} field under {% code-line %}clientConfig{% code-line-end %} :
{% code-block language="yaml" %}
...
clientConfig:
caBundle: LS0tLS1...
...
{% code-block-end%}
You can obtain the string from the secret by running the following command:
{% code-block language="yaml" %}
$ kubectl --namespace runecast get secret runecast-analyzer-nginx-cert -o jsonpath='{.data.tls\.crt}'
LS0tLS1...
{% code-block-end %}
Finally, we have the complete validating webhook configuration and we can apply it to the cluster:
{% code-block language="yaml" %}
$ cat << EOF | kubectl apply -f -
apiVersion: admissionregistration.k8s.io/v1
kind: ValidatingWebhookConfiguration
metadata:
name: "runecast-validating-webhook"
webhooks:
- name: "deny-critical.runecast.com"
rules:
- apiGroups: ["*"]
apiVersions: ["v1"]
operations: ["CREATE","UPDATE"]
resources: ["pods","daemonsets","deployments","replicasets","statefulsets", "replicationcontrollers","cronjobs","jobs"]
scope: "Namespaced"
namespaceSelector:
matchExpressions:
- values:
- '1'
operator: In
key: runecast-admission-policy
clientConfig:
service:
namespace: runecast
name: runecast-analyzer-nginx
path: /rc2/api/v2/k8s-admission-policy-review/policy/1
port: 9080
caBundle: LS0tLS1CRUdJTiBDRVJUSUZJQ0FURS0tLS0tCk1JSURsVENDQW4yZ0F3SUJBZ0lRQm5SUk9PalJ5ek9Wa1FaOWNHU05rREFOQmdrcWhraUc5dzBCQVFzRkFEQXYKTVMwd0t3WURWUVFERXlSeWRXNWxZMkZ6ZEMxaGJtRnNlWHBsY2kxdVoybHVlQzV5ZFc1bFkyRnpkQzV6ZG1NdwpIaGNOTWpJd09EQXhNVE15TXpFeldoY05NalF4TVRFek1UTXlNekV6V2pBdk1TMHdLd1lEVlFRREV5UnlkVzVsClkyRnpkQzFoYm1Gc2VYcGxjaTF1WjJsdWVDNXlkVzVsWTJGemRDNXpkbU13Z2dFaU1BMEdDU3FHU0liM0RRRUIKQVFVQUE0SUJEd0F3Z2dFS0FvSUJBUURrRFNFd1k2ak90SnBEZjR1c3paTWVQMThaWjBtdzRsWmUzK1Y2Rm9uNgpoNnd4SU1BM1NsTTU5NW9IM2hIUU1JWE5uZGhBeW5lOUdxZmVnQk5hVWZuSGw3andnSFl5Q05YaXNON1pld3dTClJLYlZuZlQ4MTgva2YreGlMZVB6dkM4Ulc3OGJGWmVnMGxpeG83ZmdNd25YTG5iVmRYR0V4dVFpWXNmUUQ3bXIKZlFaOG1XWmxpQmVETkJuZndVZlk3bWora0VZYWNnR1I5SVRrRVZuZnRaUEN3T3RJOTl1QzdTbGpYdFNkZ1ZzTAo3QWl0a1A2cTAvRG9zaVN4cThxSjkvTHFUdGEwbUI5ZFZnNk12MWN0SmpvakJkckMvL0ErcTFnS0xPNi9GSXVyCkxoaXcwcFU4QXdSK0dGR1hELy9SQjFEK2ZuOXhZTlpJU3dOcmowOENCUlZKQWdNQkFBR2pnYXd3Z2Frd0RnWUQKVlIwUEFRSC9CQVFEQWdXZ01CMEdBMVVkSlFRV01CUUdDQ3NHQVFVRkJ3TUJCZ2dyQmdFRkJRY0RBakFNQmdOVgpIUk1CQWY4RUFqQUFNR29HQTFVZEVRUmpNR0dDRjNKMWJtVmpZWE4wTFdGdVlXeDVlbVZ5TFc1bmFXNTRnaUJ5CmRXNWxZMkZ6ZEMxaGJtRnNlWHBsY2kxdVoybHVlQzV5ZFc1bFkyRnpkSUlrY25WdVpXTmhjM1F0WVc1aGJIbDYKWlhJdGJtZHBibmd1Y25WdVpXTmhjM1F1YzNaak1BMEdDU3FHU0liM0RRRUJDd1VBQTRJQkFRQmhFSDBsRm96SwpFQnU1aHQ2ejd5VkRpKzQ1YkZlR3EyeVlOVUZSWTl5ZzdaVVVyTkcyOTFEeFduTnNJL3NIUTFBckczTlljeHZKCkNGRTBhUU9jZ0RPN1JUdHYwYm1VMkM4NHMya1pyRWZwcksyYTFVU3ZWYzNZRGRPTmVqbFYwcU1ZVS9IdE1ZR20KelBLSkR3VXlWWlJXTHpWSXRrQXJ2QTlvZStXdXptcTFPc1hwUEpEcG5vMjY0a1Ywb3FvYkpoMlhPLzlWcnlsUQpTTzZ4NXp6eG1jdE5WWWM4K1hVajl6dVJqSExNK2FOV3h6T3FJaE81azdmWFNFNkxpL1BreFpYMksyZkpKOUZFCnZNenMxVjdBMWFUOWhuSGtIUTMvNmlsWUU0OGhLWEpQVzRJQkZwMkJhRVZDa0JIeU4xSFhLWEliK3diKzA3Y3AKMUJrRG1ObU4zZmlvCi0tLS0tRU5EIENFUlRJRklDQVRFLS0tLS0K
admissionReviewVersions: ["v1", "v1beta1"]
sideEffects: None
- name: "deny-fixed-critical-and-medium.runecast.com"
rules:
- apiGroups: ["*"]
apiVersions: ["v1"]
operations: ["CREATE","UPDATE"]
resources: ["pods","daemonsets","deployments","replicasets","statefulsets", "replicationcontrollers","cronjobs","jobs"]
scope: "Namespaced"
namespaceSelector:
matchExpressions:
- values:
- '2'
operator: In
key: runecast-admission-policy
clientConfig:
service:
namespace: runecast
name: runecast-analyzer-nginx
path: /rc2/api/v2/k8s-admission-policy-review/policy/2
port: 9080
caBundle: LS0tLS1CRUdJTiBDRVJUSUZJQ0FURS0tLS0tCk1JSURsVENDQW4yZ0F3SUJBZ0lRQm5SUk9PalJ5ek9Wa1FaOWNHU05rREFOQmdrcWhraUc5dzBCQVFzRkFEQXYKTVMwd0t3WURWUVFERXlSeWRXNWxZMkZ6ZEMxaGJtRnNlWHBsY2kxdVoybHVlQzV5ZFc1bFkyRnpkQzV6ZG1NdwpIaGNOTWpJd09EQXhNVE15TXpFeldoY05NalF4TVRFek1UTXlNekV6V2pBdk1TMHdLd1lEVlFRREV5UnlkVzVsClkyRnpkQzFoYm1Gc2VYcGxjaTF1WjJsdWVDNXlkVzVsWTJGemRDNXpkbU13Z2dFaU1BMEdDU3FHU0liM0RRRUIKQVFVQUE0SUJEd0F3Z2dFS0FvSUJBUURrRFNFd1k2ak90SnBEZjR1c3paTWVQMThaWjBtdzRsWmUzK1Y2Rm9uNgpoNnd4SU1BM1NsTTU5NW9IM2hIUU1JWE5uZGhBeW5lOUdxZmVnQk5hVWZuSGw3andnSFl5Q05YaXNON1pld3dTClJLYlZuZlQ4MTgva2YreGlMZVB6dkM4Ulc3OGJGWmVnMGxpeG83ZmdNd25YTG5iVmRYR0V4dVFpWXNmUUQ3bXIKZlFaOG1XWmxpQmVETkJuZndVZlk3bWora0VZYWNnR1I5SVRrRVZuZnRaUEN3T3RJOTl1QzdTbGpYdFNkZ1ZzTAo3QWl0a1A2cTAvRG9zaVN4cThxSjkvTHFUdGEwbUI5ZFZnNk12MWN0SmpvakJkckMvL0ErcTFnS0xPNi9GSXVyCkxoaXcwcFU4QXdSK0dGR1hELy9SQjFEK2ZuOXhZTlpJU3dOcmowOENCUlZKQWdNQkFBR2pnYXd3Z2Frd0RnWUQKVlIwUEFRSC9CQVFEQWdXZ01CMEdBMVVkSlFRV01CUUdDQ3NHQVFVRkJ3TUJCZ2dyQmdFRkJRY0RBakFNQmdOVgpIUk1CQWY4RUFqQUFNR29HQTFVZEVRUmpNR0dDRjNKMWJtVmpZWE4wTFdGdVlXeDVlbVZ5TFc1bmFXNTRnaUJ5CmRXNWxZMkZ6ZEMxaGJtRnNlWHBsY2kxdVoybHVlQzV5ZFc1bFkyRnpkSUlrY25WdVpXTmhjM1F0WVc1aGJIbDYKWlhJdGJtZHBibmd1Y25WdVpXTmhjM1F1YzNaak1BMEdDU3FHU0liM0RRRUJDd1VBQTRJQkFRQmhFSDBsRm96SwpFQnU1aHQ2ejd5VkRpKzQ1YkZlR3EyeVlOVUZSWTl5ZzdaVVVyTkcyOTFEeFduTnNJL3NIUTFBckczTlljeHZKCkNGRTBhUU9jZ0RPN1JUdHYwYm1VMkM4NHMya1pyRWZwcksyYTFVU3ZWYzNZRGRPTmVqbFYwcU1ZVS9IdE1ZR20KelBLSkR3VXlWWlJXTHpWSXRrQXJ2QTlvZStXdXptcTFPc1hwUEpEcG5vMjY0a1Ywb3FvYkpoMlhPLzlWcnlsUQpTTzZ4NXp6eG1jdE5WWWM4K1hVajl6dVJqSExNK2FOV3h6T3FJaE81azdmWFNFNkxpL1BreFpYMksyZkpKOUZFCnZNenMxVjdBMWFUOWhuSGtIUTMvNmlsWUU0OGhLWEpQVzRJQkZwMkJhRVZDa0JIeU4xSFhLWEliK3diKzA3Y3AKMUJrRG1ObU4zZmlvCi0tLS0tRU5EIENFUlRJRklDQVRFLS0tLS0K
admissionReviewVersions: ["v1", "v1beta1"]
sideEffects: None
EOF
{% code-block-end %}
The output of the command will confirm the configuration was applied to the cluster:
{% code-block language="shell"%}
validatingwebhookconfiguration.admissionregistration.k8s.io/runecast-validating-webhook created
{% code-block-end %}
Once done, we can immediately see it in action.
We create two namespaces and label it accordingly:
{% code-block language="yaml" %}
$ kubectl create namespace runecast-policy1
namespace/runecast-policy1 created
$ kubectl create namespace runecast-policy2
namespace/runecast-policy2 created
$ kubectl label namespace runecast-policy1 runecast-admission-policy=1
namespace/runecast-policy1 labeled
$ kubectl label namespace runecast-policy2 runecast-admission-policy=2
namespace/runecast-policy2 labeled
{% code-block-end %}
Now, in the first namespace, we try to create a pod running the latest nginx image. The image has a number of critical severity vulnerabilities where fix is not available.
{% code-block language="yaml" %}
$ kubectl -n runecast-policy1 run nginx-latest --image=nginx:latest
Error from server: admission webhook "deny-critical.runecast.com" denied the request: Image scan in Runecast Analyzer found policy violations: (Rejected by policy 1: 'No critical vulnerabilities').
{% code-block-end %}
We were prevented from running the pod. Now we will try to create the same pod in the other namespace where critical vulnerabilities are allowed, if the fix is not available:
{% code-block language="yaml" %}
$ kubectl -n runecast-policy2 run nginx-latest --image=nginx:latest
pod/nginx-latest created
{% code-block-end %}
The pod was created. We can now try to create a nginx pod with an older image which will violate the policy id 2:
{% code-block language="yaml" %}
$ kubectl -n runecast-policy2 run nginx-1-19 --image=nginx:1.19
Error from server: admission webhook "deny-fixed-critical-and-medium.runecast.com" denied the request: Image scan in Runecast Analyzer found policy violations: (Rejected by policy 2: 'No critical or high severity vulnerabilities with available fix').
{% code-block-end %}
Again, we were prevented from running the pod.
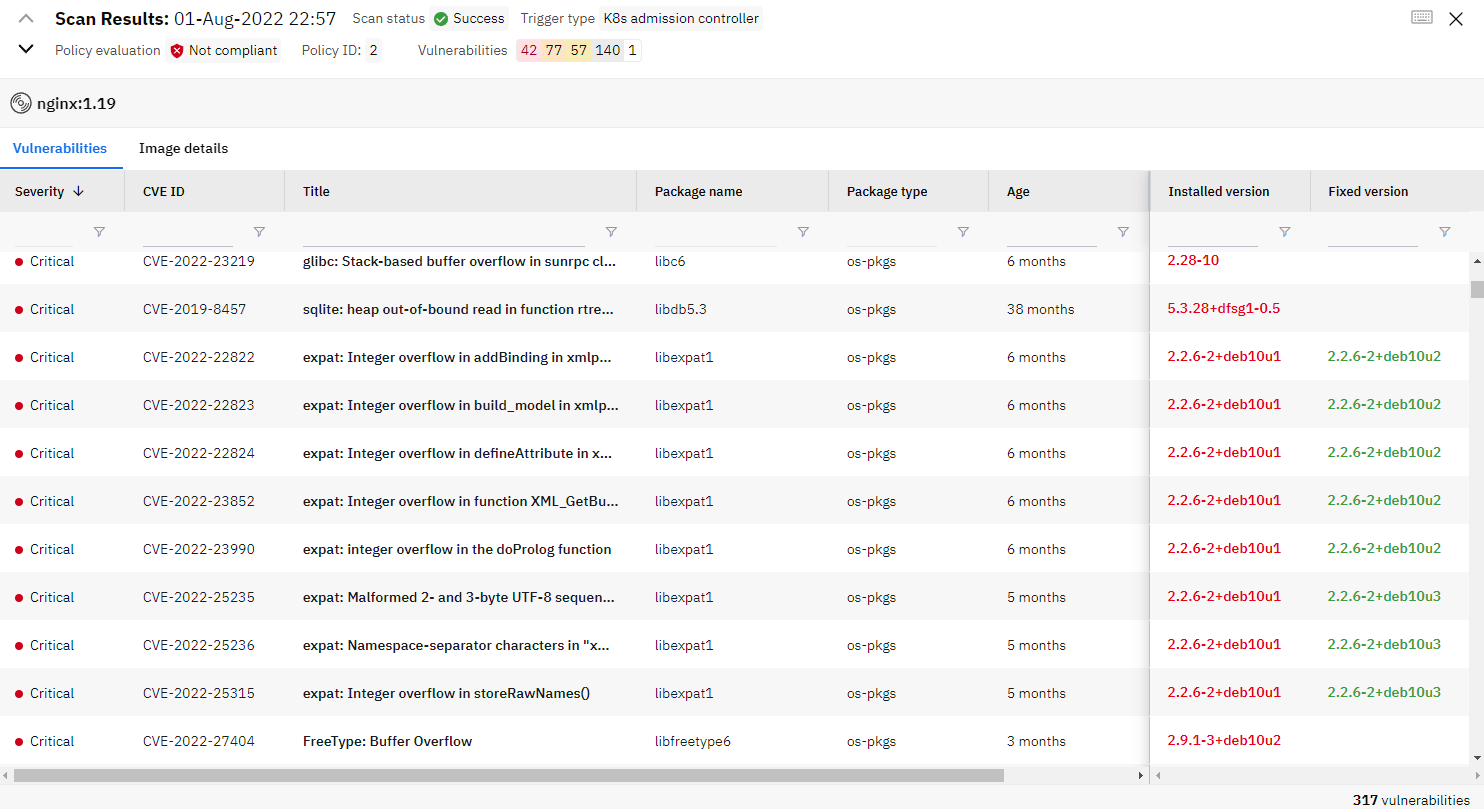
To find out more about the image scan results we reach to Runecast and navigate to Image Scanning. The results of each admission are presented as a line in the list indicated by the Trigger type of K8s admission controller.
When we select a specific scan, a pop-up window will open with the scan details - evaluation result, policy ID, number of vulnerabilities, list of the vulnerabilities and other useful info.
After clicking on a specific vulnerability, details are revealed.
Using Runecast as an admissions controller allows you to feel sure that your workloads are secure from the very start. This, in turn, lowers the operational overhead for your Security and Operations teams.
Runecast is constantly innovating and adding new features to our platform. To keep up to date with what’s possible, follow us on twitter, or schedule a demo today.
See how Runecast can make your Kubernetes simpler and more secure